Thursday, December 31, 2009

Dead Man's Peanut Butter Pie


Mother humble and I were sorting through old recipes and talking about how dishes can go out of style. Like the once popular puff pastry stuffed with chicken in cream cheese recipe that just didn't sound good anymore. Many of her old recipes would make a cardiologist weep and lucky for all of us, her newer recipes emphasized a lighter fare. Flipping through the old recipes also brought up the infamous peanut butter pie.

My younger siblings and I loved this creamy peanut butter pie growing up. Until one day when I was six or seven, when I was told she wouldn't be making it anymore. Why? Mother Humble told me, and I quote "because it will kill you."

That was it.

No more peanut butter pies for twenty years.

So we were discussing the deadly nature of her old recipes and I reminded her about the time she told me as a kid that my favorite pie would kill me and how she would never make it again. She laughed and we both agreed we needed to resurrect the simple and deadly peanut butter pie while she was still in town.

Mother Humble's Dead Man's Peanut Butter Pie:
1 pie crust or gram cracker crust in a 10" pie pan or 4 similarly prepared 6" tarts

1 1/2 cups heavy whipping cream
1/4 cup granulated sugar
1 eight ounce package cream cheese, room temperature
1 cup creamy peanut butter
1 cup powdered sugar

Chocolate Glaze
3/4 cup semi sweet chocolate chips
1/3 cup heavy cream

Directions
In a bowl whip the cream with the granulated sugar and set aside. In your mixer beat the remaining ingredients until well blended. Reduce speed and slowly beat in the whip cream scraping down the sides of the bowl until just blended. Pour into your prepared pie crust and even out the top.

Prepare the glaze by placing the chocolate chips into a heat safe bowl and set aside. Bring the heavy cream to a simmer over medium heat and then pour over the chips and let stand for a minute then mix until smooth.

Smooth the glaze over the peanut butter pie and chill for several hours before serving. The dead men cut from extra pie crust are of course optional.

Roasted Sesame & Ginger Steak

'

One last 'normal' food post before I get back into making sweets again. This is a simple meal of seared, marinated steak and dipping sauce. I'm using leftover rib steaks for this recipe, but any tender steak well suited to pan searing will work just as well.

Not so Humble Roasted Sesame & Ginger Steak Marinade:
marinates 4 steaks
2 tablespoons sesame seeds
2 tablespoons light soy sauce
2 cloves garlic
2 inch piece ginger, peeled and roughly chopped
1 tablespoon dark soy sauce
1 teaspoon sake
1 teaspoon sugar
green onion

In a skillet over medium heat, toast the sesame seeds until they begin to brown and pop.

Add the toasted sesame seeds to a food processor with the rest of the ingredients and blend until the garlic and ginger are finely chopped. Add your steaks to a large zip-lock bag and add the marinade. Turn the bag to coat the steaks and allow to marinate in the refrigerator for 30 minutes to 2 hours.

Cook the steaks on the grill or in a hot skillet for a few minutes on each side, turning once. Slice and serve with green onions and the following dipping sauce:

1/4 cup tablespoons tamari or soy sauce
1 tablespoon black vinegar
1 tablespoon sesame oil paper thin slices of ginger

Oh and for the frilly green onions, just quickly slice... er... well let me make a quick diagram:


Make sense? A little? Well, just cut the onion into two inch lengths and cut along the lines leaving the center intact and then place in cold water for about 30 seconds until the ends curl.

Wednesday, December 30, 2009

Herbed Yorkshire Puddings


More holiday eats making their way onto the blog, this time a British import to our Northwest holiday meal: Herbed Yorkshire Puddings. The term "pudding" applied to something resembling a popover tends to confuse most Americans. However, I figure that the whole point of the British food naming scheme was to confuse and frighten foreigners. How else can one explain a 'toad in a hole' or 'spotted dick', right?

Anyway, this is one of the British imports I really love at the table. Another import is the traditional Christmas cracker, something that as a non-drinker I am probably never inebriated enough to enjoy properly. The type you pull, creating a large cloud of sulfur-tinged smoke in your dinning room. Yes, that kind of cracker.

In addition to lung damage, you get a prize, a bad joke and a paper/foil crown to wear throughout dinner. Mother Humble now has a large photo collection of me wearing theses silly crowns and I should probably make an effort to stay on her good side should she decide to blackmail me at a later date.

Let me simplify: Yorkshire puddings GOOD. Ms Humble photographed in silly paper crown BAD.

Good to have that settled, let's get to the puddings:

Herbed Yorkshire Puddings
From Epicurious.com
yield: Makes about 16
6 tablespoons reserved pan drippings from Roast Prime Rib or olive oil
3 large eggs
1 cup whole milk
1 cup all purpose flour
1/4 teaspoon salt
1 tablespoon chopped fresh parsley
1 tablespoon chopped fresh chives
2 teaspoons chopped fresh sage
2 teaspoons chopped fresh thyme
1 teaspoon chopped fresh rosemary

Finely chop your herbs and set aside. In a medium bowl, whisk the milk and eggs together. Sift the flour and salt into egg mixture and mix until smooth. Once well blended, stir in the herbs and let the batter stand at room temperature at least 30 minutes (or refrigerate up to 3 hours). Mix once more right before using.


Preheat oven to 450°F. Place 16 standard (1/3 cup) metal muffin cups into the oven to oven heat for 10 minutes. Place 1 teaspoon drippings from your rib roast (or olive oil) in each muffin cup . Return pan to oven until drippings are very hot, about 8 minutes. If it smells a little smokey don't worry, that is normal.

Immediately spoon 2 generous tablespoonfuls batter atop hot drippings in each muffin cup. Bake until the puddings are golden and puffy, about 12 minutes (puddings will sink in center but edges will stay puffy). Serve hot.


Tuesday, December 29, 2009

Whiskeyed Crab Soup


Mother Humble makes this soup every year for Christmas dinner. It is one of our Humble family traditions, along with making my brother (who cooks professionally) clean and shell crabs Christmas morning. Poor guy.

This is might be a somewhat eccentric Northwest addition to a typical holiday menu, but our local dungeness crab is delicious and quite possibly the best flavored crab on the planet. Anyone who disagrees with me can 'bring it' and we shall settle it mano a mano (or crabo a crabo) in the ring of crab combat!


(Mother Humble came over and dropped this enormous lump of crab into my soup when I was taking photos. She was clearly not impressed by my soup's 'little' crab meat garnish, as seen in the first photo.
Yup, that's my mom.)

Whiskeyed Crab Soup
Chandler's recipe taken from Recipezzar
Serves 6-8


Start by cleaning and shelling 2 1/2lbs of dungeness crabs (Or force a family member to do it). Reserve and refrigerate the meat for later and get to work on the stock with the shells.

Crab Stock
1 dungeness crab, shells
2 tablespoons olive oil
1/4 cup carrot, chopped
1/2 cup onion, chopped
1/4 cup celery, chopped
4 tablespoons tomato paste
1/4 cup brandy or cognac
2 quarts cold water
2 garlic cloves, crushed
1 bay leaf
1 teaspoon dried tarragon


Heat the olive oil in a heavy stockpot. Add the crab shells, carrot, onion and celery; brown lightly. Add brandy and ignite


(Burn fingers while trying to take photos of the flaming pot). When flames have expired, add the water, garlic, bay leaf, tarragon and tomato paste.


Bring stock to a low simmer for 2 to 3 hours and reduce to 1 quart. Strain through a fine sieve and refrigerate until ready to use.


Whiskeyed Crab Soup
1 quart crab stock
1/2 cup butter
3/4 cup flour
3 cups heavy cream
1/4 lemon
1 dash Tabasco sauce
1 tablespoon Worcestershire sauce
1/4 teaspoon Old Bay Seasoning
1/4 teaspoon white pepper
2 teaspoons whiskey
1 tablespoon sherry wine
2 tablespoons butter
salt, to taste

Make a roux in a heavy saucepan by melting 4 ounces (1 stick) butter over medium heat. When foam subsides, add the flour all at once. Stir constantly, reduce the heat to low and cook, stirring until it is blond-colored (about 5 minutes).

Add crab stock, cup by cup, whisking thoroughly after each addition. Bring to a boil, reduce to a simmer for 20 minutes, skim frequently. Add heavy cream, juice from the lemon, Tabasco, Worcestershire, Old Bay and white pepper. Bring back to simmer for 10 minutes. Add the whiskey, sherry, 2 tablespoons butter and the reserved crab meat; cook 1 minute to heat through. Salt to taste.

Sprinkle with a little Old Bay seasoning and serve immediately.

Monday, December 28, 2009

Mouse Cookie Cutter Winners!


My random integer generator's picks for last week's mouse cookie cutter giveaway:

J Levine said...
I run the undergraduate research office at my university, and my students are completely in love with your science cookies, which I made for our holiday open house. You are a goddess, and I would love a cookie cutter. :)


Lauren said...
Round 2!! I wanted the mouse anyway, so this works out. :)


kk9irl said...
Omigoodness please enter me in mouse cutout contest #2!
I am definitely a bio nerd, and have interned in labs working with both drosophila and mice! 
:D


Mrs. DeRaps said...
My students would be so excited if I made them little mouse cookies! Especially with the issues we've had with actual little furry goblins in the past. 

Thanks for the opportunity!


kathy said...
Do we want you to give away more stuff? Of course we do!

How about a science cookie design recipe contest for January? We could design the cookies,make them, email you a picture and/or post them on our blogs


I don't see emails in any of your profiles (three of them are private), so if you would please email me your mailing addresses (my email is listed on the left in my blogger profile) and then post a reply in this thread saying you've done so (so I know it is you). I'll carefully package up the little cutters and send them on their way.

And yes Kathy, I would love to do a science cookie design contest one of these days, that sounds like oodles of fun. A science cookie round up would be great too!

If anyone is interested, send me photos of your cookies and permission to post them and I will periodically post a 'Not so Humble Cookie Round Up'. I have already received several batches of digital baked goods, so maybe I will do the first one sometime this week.

Sunday, December 27, 2009

She Had A Plan...


Party is over, time to take a little break from the holiday/birthday madness. At least I had Mother Humble around to assist and of course by 'assist', I mean take control and override me in her special motherly way.

She relieved me of all duties related to cooking for the littlest Humble's birthday party today. Mother Humble just booted me out of the kitchen, telling me she had 'a plan'. So I turned her loose, not that I or anyone else had the power to stop her.

That's just how Mother Humble rolls.


So she whipped up an array of little tea sandwiches and other snacks for the mid-afternoon party spread from all the ingredients I had bought for MY plan. These included Curried Chicken & Apple, English Cheddar & Spring Onion, Turkey & Cranberry, BLT, Pastrami & Swiss, PB&J, Cream Cheese & Cucumber, Egg Salad, Smoked Salmon & Dill and at least two others. All laid out on slate boards with chalk descriptions for the guests.

She also set out blanched vegetables, salads, deviled eggs, my husband's Chinese BBQ pork and whatever else she wanted.

I got to have fun playing 'tornado whips through the doll house' with the birthday girl.


Happy birthday kiddo. Your mom would appreciate a nice long nap on Monday.

Mini Chocolate Butterfly Cake


This little cake is for the birthday girl. Not a typical birthday cake for a child, but it involves all her favorite things: Chocolate with chocolate and more chocolate. I added the rabble of butterflies to give it a slightly girly feel.

My original plan was to make something involving lots of marzipan but I realized that was the cake I wanted to eat. My daughter however, doesn't give a fig for marzipan (yet). She is a fan of all things chocolate; ever since she discovered a bag of Hershey kisses at 8 months old, and then coated herself (and my ivory couch) with them.

So this is a four layer, high ratio chocolate cake, for which I will share the recipe at a later date since I have guests arriving in a couple hours. It is layered with whipped soft chocolate ganache and surrounded by a dark chocolate collar. The top has been stenciled with a little cocoa.


This was my first attempt at chocolate butterflies and they are so easy! I just printed out some photos of butterflies and slipped them under a sheet of parchment paper. I could still see the outlines of the butterflies and then I began to pipe dark chocolate over the outlines. With a few I piped the wings without a body to connect them, so I could manipulate the position of the wings on the cake. I placed my sheet of butterflies into the freezer to cool for about 10 minutes and then pulled them out and stuck them to my cake with a little more melted dark chocolate. That is it!

Now this cake is for eating! Hopefully I'll remember to get a photo of it sliced before the kiddo dives in.

Saturday, December 26, 2009

Teddy Bear Birthday Cake


Tomorrow the littlest Humble turns two and I will be spending most of today working on the food and cake for her party. However, I just finished this ferocious bear cake today, so on the blog it goes.

I picked up this Build a Bear cake pan last year for my daughter's first birthday. It was pretty easy (believe it or not) and made a cute centerpiece, so I decided to give the cake another go this year.

Last year's Bear Cake:


(This one is glazed with a little more cocoa, hence the color difference... and yes that is an enormous candle on that cupcake. I think we forgot to pick up normal candles for her cake last year. My brain had been addled by holiday preparations and I forgot)

Last year the teddy bear was dressed up like a princess, this year the bear will be wearing the same dress and accessories as my daughter.


Now, we don't eat the bear cakes. I mean, how can you decapitate a teddy bear in front of your toddler and eat it? More so, can you do that to one dressed exactly like your kid? Talk about a freaky birthday party. Might as well put a down payment on all that therapy your kid is going to need now.

So, we use the bear as centerpiece on the buffet table. Last year I gave her a yummy pink vegan cupcake to devour, or rather coat herself in as most babies her age tend to do. This year, since she will likely eat the cake, I am baking a mini cake to place in front of the bear in her favorite flavor: Chocolate.

The chocolate cake photos will come later, as I'm still working on the assembly.

So here are a few photos from the bear's assembly process:


Turning the cake out of the pans and trimming it.

Applying butter creme to hold the two sides together.

Glazing the bear with powdered sugar, little cocoa and milk.

Coating the head in turbinado sugar.

Thoroughly coating my floor and counters with the stuff as well.


Fondant in process. About to put 'shoes' on those ridiculous blocky bear feet. Should I ever try to put shoes on this bear again, I'm going to trim the feet into something a little less brick-like.


Finished bear cake


I used about half pound of fondant for the bear. I tinted most of it navy blue for the dress. The shoes are tinted light gray with super black and brushed with silver luster dust. The soles are fondant tinted with warm brown. The eyes and nose are more fondant tinted with super black. Most of the fondant is 'glued' to the bear with butter cream.

The striped areas are thin strips of navy blue rolled onto a sheet of white fondant and then cut out. The ribbon was held in place with a little royal icing. The white scalloping is white fondant cut out with a scalloped short bread cutter and pasted onto the dress with a little royal icing.


Oh and for anyone who has emailed me recently and has not yet received a reply, I will get around to it.

I'm just, you know... cooking. A lot.

Tuesday, December 22, 2009

'Tis The Season


My mother, in town for only 12 hours and already having her way with all my food.

Just a quick blog update, since we're verging on the holidays and Mother Humble arrived in Seattle this morning.

These events will likely contribute to somewhat sporadic posting to the blog this week. There is plenty to be done and I will be competing with my mother for kitchen time and of course, all my ingredients.

I also have a couple big baking project to work on. I'll be whipping up two cakes this week and their construction will likely take several days. So, I expect blog posts this week to be rather, you know, cake oriented.

What kind of cakes? Well, you'll just have to wait and see.

Wii, Xbox, PS3 Controller Sugar Cookies


Time for a different kind of nerdy cookies, the gamer sort.

These cookies were suggested to me by my brother-in-law, who is an avid gamer. I admit to being a bit of a... well I'll just use a venn diagram to explain:


Make sense?

I actually have all these consoles in my house (and several older systems). I figure owning them all is socially acceptable since I am still my 20s (just barely). Though I won't pretend that I am in any way a skilled gamer. For example, I'm that person in Halo who gets confused by the controls and just spins around while other people walk up and throw grenades at them. Yea, I'm that person. Since having a child, my gaming has been limited to doing yoga on my Wii Fit.

So the cookies, this was my first attempt at making controller cookies. Usually I don't post the practice-cookies on the blog but these were neat enough that I'll go ahead and post pics. Usually when trying out a new cookie I do a couple test batches, work out all the kinks and settle on a design. With these, there was so many steps with long drying periods between each that I wasn't feeling up to starting another batch last night.

For now, the beta-cookies will have to do. So here we go: PS3, Xbox and Wii controllers (click for a larger version).


They need more careful icing next time, so they look more polished. I usually ice my practice cookies rather quickly, so next time I attempt these they'll have a more refined look. I do like the texture of the thumb pads on the PS3 controller. Though I won't do that next time on the Xbox D pads, since they are smooth. I also think I may apply a little silver luster dust to the metalic X box logo next time.

To make these, I used my normal sugar cookie and icing recipes (linked here).

To tint my icing I used the following Americolor gels:
Super Black
Avocado
Leaf Green
Navy Blue
Super Red
Bright White
Egg Yellow


I also used a little dark gray sanding sugar.

To make the cookies I free hand cut out the shapes, then baked them and allowed them to completely cool. I then outlined each and flooded them with the controller appropriate colored icing. I allowed the flooding to dry for several hours and then pipped on buttons, sprinkling the D pads with gray sugar. After all that had set, I piped on the remaining details.

I also want to make a classic NES controller next time, just because I am feeling nostalgic for those childhood thumb calluses.

(edit: Yes, I know they are not called 'Wii controllers', that they are in fact 'Wii remotes' or 'Wiimotes'. I hope that I didn't incite painful levels of nerd-rage in any sensitive gamer types by incorrectly, and so cavalierly, referring to them as wii controllers.)

Sunday, December 20, 2009

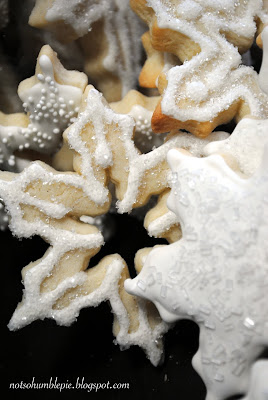
Sparkling Snowflake Sugar Cookies


Not all my cookies are nerdy; some are completely normal.

Here are some of the 200 cookies that kept me busy on Friday. These were packaged up in glass jars to be handed out as gifts. Others were laid out for munching at a holiday party this afternoon.

They were really simple to make (which is great when you're making hundreds), no food coloring needed, iced with a single tip and quickly decorated with scattered sugars and nonpareils.


To make these cookies I used my standard cookie and royal icing recipes (both are linked here). I used a few of my Fox Run Five Piece Snowflake Cookie Cutter Set to do the cut outs. I used the two largest cutters to do the cookies and then removed some of their centers with the two smallest cutters.


I made a batch of royal icing, and rather than mixing it to hold a stiff peak I added just a little more water. Not enough to make it suitable for flooding mind you, but just enough so that I could pipe my icing onto the cut out snowflakes and have it settle smoothly but not run off the edge. I filled my piping bag with this icing (reserving some for flooding) and used a small round #3 Ateco piping tip. On my cookies, I either piped the icing onto the entire surface or I did outlines and other simple designs. I then sprinkled some of my cookies with sanding sugar, coarse sanding sugar or nonpariels after I finished each one and set them aside to dry.


For the cookies without the cutouts I piped a border around the edge and flooded them with my remaining royal icing. I then either let these dry or sprinkled on more sanding sugar, coarse sanding sugar or nonpariels. For the cookies that I allowed to dry plain, I piped some additional designs ontop of the dry flood work (dots, stars, outlines and other simple designs). I then sprinkled these with sugar to help the designs stand out against the floodwork background.


One last nerdy note, a few of these cookie cutters could pass as fractals. Mmmmm, duel use cookies cutters.

Saturday, December 19, 2009

Science Cutter Giveaway: Winners & Mouse Round #2


Wow! I've been gone all day, but I'm finally back and able to post and pick the winners for the science cookie cutter giveaway.

I had been tied up by the construction of a christmas present that required "some assembly" for most of the day. The gift ended up taking my husband, brother-in-laws and I over three hours to assemble. In my humble opinion, 'some assembly required' is a bit of an understatement when four able bodied people can't complete something in under 3 hours.

So these cookie cutters! I have to say I am very surprised about how many people were actually interested in this giveaway. I expected maybe 50, not over 200. I'm really digging the nerd cookie love here, folks.

So this is how we're going to do it. I'm going to give away both the mouse and the Drosophila. Since roughly 1/250 odds are terrible and I really want to give away cutters to as many of you awesome folks as possible. So I'm making two lists, one for folks interested in the fruit fly and another for the mouse. If you didn't state a preference, I flipped a coin to choose for you. I then used a random integer generator to pick a cell on my spread sheet from each column to select the winners.

So, without further ado, lets do this:

unexpectedthings won the Drosophila
"Drosophila!! My twin sister studies these little guys and is always sending me emails about her triumphs of changing their eye color or curling their wings using mad scientist techniques. I'd love to put her to work making delicious fly cookies to out-geek the rest of the family."

Colleen won the mouse cutter
"Oh, my students would LOVE to bite into these cookies! We're not supposed to have parties in our classrooms, but this would be "science"-related, so it would have to be OK, wouldn't it? ; ) I like the mouse the best!"

I don't see emails in your profiles, so if you would please email me your mailing addresses (my email is listed on the left in my blogger profile) and then post a reply in this thread saying you've done so (so I know it is you). I'll carefully package up the little cutters and send them on their way.

For everyone else: I know some folks asked me to post a link to where you could find these cutters should they not be picked. Well I searched around trying to find these cutters and was not able to locate the mouse. I did however find the Drosophila (for $1!). Though, Sur la Table has missidentified it as a bee, but I will forgive them since I figure their staff lacks a trained cookie entomologist to properly identify their cutters. Anyway, here is the link: Drosophila Cutter.

As for you folks eager for a mouse cutter just like mine, I'm sorry I cannot find the exact one online: I did stumble across Mouse #1 and Mouse #2 cookie cutters on amazon. They are not quite as cute as mine though, which is why I went out and bought 5 more mice today. I'm going to give these away as well.

(Edit: Ronnie found the mice online: LINK. Jacqueline also found them here: LINK. Bea found it here as well: LINK)

So... if you're interested in a second round of mouse cookie cutter giveaways, go ahead and post a comment below and I'll pick 5 winners next Saturday.

Friday, December 18, 2009

Science Cookies: Zebrafish


Quick post tonight, because I am up to my elbows in icing trying to whip out several hundred cookies for a holiday party this weekend.

Tonight's cookie is yet another model organism, this time the humble zebrafish.

I finally had an excuse to use some of the edible glitter I have kicking around in my kitchen. However, once I cracked open the little jar and saw the fine powder, I was terrified of it.

Nothing that sparkly should be food safe, it just isn't natural. Granted, it does make the fish shimmer in a semi-realistic--and somewhat menacing--way. Like one of those frogs or insects that use brightly colored markings to indicate (or mimic) toxicity and deter predators from eating them. I found myself reluctant to take a bite.

Of course, I did try them. Two, actually, to see just how edible this 'edible glitter' really is. I expected it to be gritty or to add some texture but I couldn't actually feel or taste anything. They taste so... normal. Which I suppose is a good thing.

The one difference I did note was the absurdly glittery lips that resulted from eating these cookies. A plus I suppose, if you want to adopt that chic Patrick Tribett look.

Thursday, December 17, 2009

Jumbo 'Hostess' Binary Cupcakes


Not all of my cupcake batter went to making brains yesterday, I reserved half of it to make yet another go at the elusive Hostess style cupcake.

This has to be my fourth time making them. There have been some dramatic failures in the kitchen attempting these. Now the chocolate glaze and cupcakes themselves are not hard to make, it is that creme filling! What IS that stuff anyway? Not sure where to start with the filling, I did a little research into other peoples cupcakes of that type a few months ago and started trying new recipes.

Let me tell you all, there are some really gross filling recipes out there! One that I tried was basically sweetened country-style gravy. I gave it a shot because it was reminiscent of pastry cream--minus the egg yolks--and although I was skeptical, the recipe's reviewers seemed to like it. So I gave it a shot, and wow... it was so incredibly vile.

That was failure number one.

Two and three were much better but they either lacked the right texture or the filling absorbed into cake within 24 hours. Eventually, I figured that whatever was inside a hostess cupcake was not man-made and was created with technology on par with CERN's new Hadron Collider. So I gave up. That is, until I had a breakthrough while making fudge for the holidays...

I was going through a lot of marshmallow creme and while noshing on a spoon it came to me....this stuff is pretty close! Really close, actually. So I decided to give the cupcakes one more go and it resulted in my Jumbo Binary Cupcakes with creme filling. Fully edible and finally, a result better than the store bought variety.


I was going to put nucleotide bases across the tops of these cupcakes, but I changed my mind last minute and put binary on them because I haven't done anything computer-science oriented for the blog yet. I know programmers don't code in binary, but even with my Java and C++ background I couldn't come up with a clever 10 character, comp-sci oriented message to sprawl across the cake. Binary is instantly recognizable and cute, so I went with that.

(Though, Mr. Humble gave me flak for not attempting to write out "cupcakes" in binary, but that is probably 50 characters long!)

Anyway, that's enough rambling on about cupcakes. Let's get on to how they were made.

Not so Humble's Creme Filled Jumbo Binary Cupcakes:
To make these I rounded up the following:

one batch of devils food cake batter
jumbo sized muffin pans
18 paper mini cupcake liners
6 oz semi sweet chocolate finely chopped
1 tablespoon corn syrup
3/4 cup heavy cream
3 tablespoons butter at room temperature
7 oz jar marshmallow creme
3 oz white chocolate

Since Hostess cupcakes don't have liners or crimping around them I wasn't going to put a paper liner into my jumbo muffin cups. Instead, I used a mini cupcake liner, flattened and placed it into the bottom of the cup. These things are exactly the right size when smoothed out to line the bottom of your large muffin tins. Great trick to help those muffins pop right out.

So I divided my batter among 18 of the muffin cups and baked according to the instructions (Yes, I know... I'm using cake mix, bad foodie move but also a busy mommy foodie today). I allowed them to cool completely, peeled the liner off the bottom and then got to work on the filling and glaze.

To make the filling, beat together the marshmallow creme and the butter and then put into the fridge to chill. Using a 1.5-inch biscuit cutter, core out the centers of the cupcakes and remove some of the cake from the middle. I prefer to do this over piping in the filling because it allows me to really stuff my cupcakes with the creme. Fill each cupcake with a heaping tablespoon of the creme and then replace the "core" you removed earlier, after trimming the excess cake off its bottom.

Now your cakes are ready to be glazed.

To make the glaze, place the finely chopped chocolate into a heat safe bowl and bring the cream and corn syrup to a simmer. Pour the hot cream over the chocolate and fold together until smooth. You can either dip the cupcakes into the glaze, or like I did, apply the glaze with an offset spatula (I like to load on as much as possible).

Allow the cupcakes to dry for about 30 minutes and then you can work on your binary decoration.

Melt the white chocolate in the microwave, being careful as it can scorch fairly easily. Then using a piping bag with #2 tip, pipe on the ones and zeros to finish the cupcakes.


Let the glaze set for a few hours until it is no longer shiny and then they're ready to serve. That is, if you can wait that long.

Wednesday, December 16, 2009

Chocolate Ganache Filled 'Brain' Cupcakes


These cupcakes are for Jurij Dreo, a med student working in a neurophysiology lab in Slovenia. Jurij wanted to see something neuroscience or brain related on the blog and this is what I've whipped up: chocolate ganache filled brain cupcakes! Because it is a well known fact that human brains are filled with chocolate ganache.


Originally, I was trying to think of what cake flavor would be appropriate for these cakes, I wanted something "smart". You know, a brain appropriate flavor. So Mr. Humble and I were discussing the possible cupcake flavors and this is how that conversation went:

Me: I need ideas for a cupcake flavor that is brain related, or 'brain healthy.' You know, sort of like how Cheerios are considered 'heart healthy', what would be brain healthy?

Mr. Humble: Fish is brain healthy, you could make salmon cupcakes.

Me: Gross. I'm not making salmon flavored cupcakes.

Mr. Humble: Why not, you did make a bacon cake.

Me: ...


So I tossed out the idea of being clever by making 'brain healthy brain cupcakes' out the window. Well, I suppose cacao could be considered a 'brain food', but certainly not in this form. So I am not going to pretend these little cakes are in anyway good for you. These cupcakes, topped with a swiss meringue butter cream and a chocolate ganache filling, pack all the health benefits of a stick of butter. Meaning, they're really good.

Let's get down to how they're made.


So, I've taken 18 ordinary devils food cupcakes and tarted them up with the following (these are both adapted from Martha Stewart's Cupcakes):

Chocolate Ganache:
4 oz semi sweet chocolate, finely chopped
3/4 cup heavy cream (40% milk fat)
1 tablespoon light corn syrup

Place the chocolate in a heat proof bowl and set aside.

In a small sauce pan heat the cream and corn syrup to a simmer, stirring constantly. Once the cream is hot, pour it over the chocolate and allow it to sit for 3 minutes then mix well. I poured my ganache into a squeeze bottle (like these) and then inserted it into my cooled cupcakes to fill them. You can also do this with a piping bag. That's it for the filling, now the cupcakes are ready for frosting...

Swiss Meringue Butter Cream:
5 large egg whites
1 pound butter (4 sticks) at room temperature divided into tablespoons
1 cup granulated sugar
1 teaspoon vanilla

Bring a sauce pan of water to a simmer and in a metal bowl combine the egg whites and sugar. Whisk the eggs and sugar in the bowl sitting over the pan of water (not in the water) for several minutes until the mixture is creamy and there is no grit if you rub the mixture between your fingers.

Then transfer the eggs to your stand mixer with the whisk attachment and beat them to stiff but not dry peaks. Allow this mixture to cool completely (roughly 10 minutes). Then on medium speed begin slowly beating in all the butter a few tablespoons at a time and then add the vanilla. The mixture might look a little curdled at first, however continue beating until it comes together in a light fluffy mixture. Then remove the whisk attachment and use the paddle to mix the frosting on low speed for 2-3 minutes to beat any air bubbles out of the frosting.
Using a piping bag equipped with a medium round tip (I used an Ateco #12) and filled with my frosting I pipped a half inch mound onto each cupcake. Then I began crafting my 'brain'. I started by piping a D-shaped outline on each side of the frosting mound and then filling the empty space with swirly brain-like frosting coils.


That is it! Brain cupcakes.

These were soooo yummy. Swiss meringue butter cream has to be my favorite frosting (it will kill you, but it is just so yummy without being too sweet) and it compliments the bittersweet ganache very well. These are best kept at room temperature and eaten the same day.


Brains om nom nom!

Wait... I totally missed my chance to fill a post with zombie jokes.

Dang.

Tuesday, December 15, 2009

English Toffee


Small batch of English toffee coming out of the Humble kitchen today. It was a perfect batch and enjoyed by everyone.

Though, some folks did moan about the prolific, tempting and somewhat 'less than healthy' stream of treats that has been coming out of my kitchen lately. I got a request for "Broccoli Toffee". Yeah, too bad I'm out of broccoli right now. I do have 2 boxes of tofu sitting in my fridge though, maybe I can 'toffee' it. That will show them.

Anyway...

This stuff is so light, crisp and buttery. Yum! Fudge I can handle myself around, but I admit to having overindulged on the scraps from my toffee cutting today. I cannot resist the delicate snap of freshly made toffee, nothing out of a can ever comes close.


Not so Humble's English Toffee:
yields roughly 50 pieces

1 1/4 cups unsalted butter
1 tablespoon light corn syrup
1 cup granulated sugar
1/2 teaspoon kosher salt
3 cups finely chopped toasted almonds
10 ounces bitter sweet chocolate, chopped
vegetable oil (soybean or safflower)

Over low heat, melt the butter in a sauce pan. While waiting on your butter, rub a marble slab with a little vegetable oil. If you don't have a marble slab you can use something else that is at minimum 2 feet square, secure, flat, nonporous and heat resistant. Yes, ALL those things. Think safety here because you're going to be pouring your molten sugar out onto it later. Then grease a rolling pin and a pizza cutter with a little more vegetable oil.

When your butter has melted, add the sugar, corn syrup, salt and 1/4 cup of water. Bring this mixture to a boil over medium heat, stirring gently with a wooden spoon or heat safe spatula. Attach your candy thermometer and continue stirring. After about 8-10 minutes your mixture should hit 260°F, then add 1/2 cup of the chopped toasted almonds. Continue stirring gently for another 8-10 minutes and bring the mixture to 305°F, then immediately pour the toffee onto your oiled slab. Being careful, because you're dealing with 300 degree molten sugar, roll the mixture out until thin. You're aiming for roughly 1/4 inch thick. Work quickly because you have to cut it before it hardens. Then using the pizza cutter, slice the toffee into squares or bars. After a few minutes the toffee will be cool enough to gather up and set aside. It will also be cool enough for nibbling... om nom.

Melt your chocolate (temper it too, ideally) and pour it into bowl and then dip the toffee, shaking off the excess. Place the toffee into a bowl with the remaining almonds and coat thoroughly. Place the finished toffee on a baking sheet to dry. Repeat with the rest of the toffee.

You don't have to chocolate coat all the toffee if you like it plain (it is good!). However if you do, store it in an air tight container as toffee absorbs moisture from the air and it will lose that light and crisp texture if left out.


There are additional tips for candy making in the comments section of this post, so check them out.


Just a general blog note:

I'm going to be turning comment moderation on at night now. The spammers have been running amok and it is annoying to wake up and then have to purge all the ads for 'discount' designer clothing, performance enhancing drugs and links to girly sites. Comments will be approved first thing in the morning.
Related Posts with Thumbnails